How to Start a Writing Project
- Choose "Create New" from Book Writer's Project menu to open the
Project Manager.

- In the Project Manager's Title edit box, enter the title of your project, for example, "Moby Dick Redux," in place of "NEW." Leave out the quotation marks, of course.

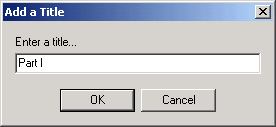
- Click the Add Title button. Enter a title for a section of your project, for example, "Part I."

- Click on the title that you just created or the book icon beside it.

- Click the Add button. A standard Windows file-selection dialog will open up.
In this example, suppose you have a file named "c:\oceans\whales\chap01.rtf". Type in this name or find the file in the
file-selection dialog and select it. You can select multiple files by holding down the Shift or Ctrl key while clicking on file names.

NOTE that you could enter the name of a non-existent file that you intended to create later. At this point, there is no difference between extant and future files. Later, when you are using the Project Commander, a double click on an extant file will open it, and a double click on a non-existent file will, with your permission at a prompt, create it.
- Click on the file name that you just added. Book Writer extracted this name from the path of the file you named or selected in the previous step.

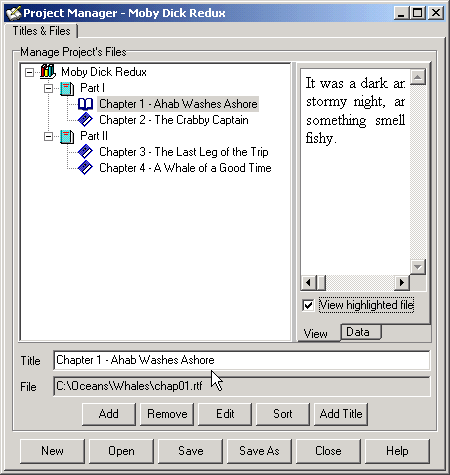
The blue books in the diagram signify titles that have files associated with them. The cyan books signify structural titles that have no files on disk.
- To have a name more descriptive than the file name appear in your project, click on the name in the project tree diagram again to edit it beside the icon; or enter a name in the Title edit box. In this example, we are titling the file, "Chapter 1 - Ahab Washes Ashore." This title refers to the file "chap01.rtf" on disk, but now we are dealing with a literate phrase instead of a computer file name.

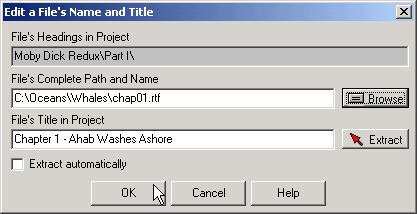
Alternative method: Click on a name in the project tree to select it and then click on the Edit button. A dialog will appear, in which you can edit the file name and the title. Click on Help when in the dialog for more information.

- Click on "Part I" again, then the Add button; and create another file and title. For this example, name a non-existent file "chap02.rtf" (its disk name-to-be) and retitle it "Chapter 2 - The Crabby Captain" (its name in the project).
- Click on the project heading, "Moby Dick Redux," at the top of the project tree diagram. Add "Part II" by following step 3 again.
- Add two chapters to "Part II" by repeating steps 4 through 8 for each chapter. For this example, create "chap03.rtf" and "chap04.rtf" and title them "The Last Leg of the Trip" and "A Whale of a Good Time," respectively.
- When you are done, your new project should look like this--if your "c:\oceans\whales\chap01.rtf" file starts out with the powerful hook, "It was a dark and stormy night, and something smelled fishy."

- Click the Save button. A standard Windows file-save dialog opens. Give your project a file name and save it. You may use any valid file name--your project name is recommendable. In this example, the project's file name is "C:\Program Files\Yadu Digital\Book Writer\Moby Dick Redux.bwp". Book Writer forces the extension ".bwp" (Book Writer Project).
Now, even if your project has scores or hundreds of files, you need to remember only one file name, "Moby Dick Redux" in order to open, edit, copy, move, index, zip, search, and otherwise manage your project.


